Thursday, June 29, 2017

Quick and Easy Birdhouse Garden

If you need a quick card and want it to look like you spend a lot of time on it, take a look at this one.
Over on the Dies R Us Inspiration Blog you will find this one. 
 Just using one die from Tutti Designs, I made this colorful and dimensional card.

This die is so intricate and cuts so easily that I cut it twice.  First out of white, and then again out of brown card stock.  Just as you see here.  I used some markers to color up the flowers and the grass the way that I liked them.  Then I adhered the bird houses in place on the white layer.  After that, I put on a nice coat of Glossy accents.  You should let that dry nicely before adding it to any card base that you like.  I used some foam tape to pop them out.  This was all so easy to do and I love how this looks.  It can be used for any occasion too. I cut a few more bird houses and left them in the package to use in the future.  I am sure that will happen soon.


The team at Dies R Us is working hard to give you some inspiration every day, so be sure to stop by and let them inspire you to create your own beautiful projects.


      Tutti Designs - Dies - Birdhouse Garden


Don't forget to come join in the fun at the Dies R Us Challenge Blog.
  There's a new challenge theme offered on the 1st and 15th of each month
 and one lucky randomly drawn winner will receive a gift voucher prize to
 the Dies R Us Store.  For your convenience, all the important
 Dies R Us links are provided below.
click below for:

Thursday, June 22, 2017

Seize the Brithday - No Toppings

Hello!   It is time for another challenge at Seize the Birthday.  Birthday cards should be fun and cute.  Right?  What is more fun than an interactive card.  I tried my hand at doing one of those this challenge, and I think I like it.  Remember, there are no toppings this challenge.
                                           " Our "Toppings" option this time is...
No Toppings!"


We have a new Special Party Guest too.  Her name is Cathy and you can see her blog Here!
     Please check out what all of the other designers have done at Seize the Birthday.

Here is my example card. 
 Notice the wheel on the right side of this card.  
It turns an inner circle that changes the object in the circle.  

   Here, you can see the otter disappearing, as I turn the wheel.
 
 I used the My Favorite Things Stamp set, Otterly Love You  . Gina K designs heavy white card stock and distressed ink in Evergreen Bough. I colored the otters with my Copic markers, C1, C3, C5, and C 7, and of course red for the heart. I can think of so many cute critters that would make a great card for a birthday, or for any other occasion.
 I saw this done Sandy Allnock and made just a few changes.  I only put in three images instead of four and made them a bit bigger than the window.  
I hope that I have inspired you to make an interactive card.  But that is not necessary for this challenge.  You have a free design this time as there are no toppings, just make it a Birthday card.  
Thanks for joining us at Seize the Birthday, your comments really make my day special. 

How Sweet is This!

Barbara here today over on the Dies R Us blog.   I am sharing with you something that I love to do on my cards.  That is add a tag. For this card, I was thinking more masculine.   


                                                          Here is how I made with card. 
On a base of Kraft card stock, I used a wood grain embossing folder.  Then sponged some Distress Oxide ink Vintage Photo, on it.  That gave it more definition.
These are the dies that I used to create the tag.  You can see that I used two of the large tags to die cut a frame, and then I also cut the tag out of vellum. The coffee cup is cut from gold foil paper as well as the sentiment, You're so sweet.

       Here is a closer look at the tag. I added a flower decal from my stash as well as a few gold drops and a wooden maple leaf with the brown polka dot ribbon.
Here are the dies that I used for this card.  You can find them at the Dies R Us store.
The team at Dies R Us give you inspiration every day.
Don't forget to come join in the fun at the Dies R Us Challenge Blog.  There's a new challenge theme offered on the 1st and 15th of each month and one lucky randomly drawn winner will receive a gift voucher prize to the Dies R Us Store.  For your convenience, all the important Dies R Us links are provided below : 
Click below for:

Wednesday, June 14, 2017

Mod Squad Chalolenge - Make it Square!

I am the host for this weeks Mod Sqaud Challenge, I have a simple challenge for you today.  Just make your card square.  I love square cards,, but don't often make them.  It is usually because I need to make an envelope.  but what fun is that to have a matching envelope for your card.

Here is my example this week.  
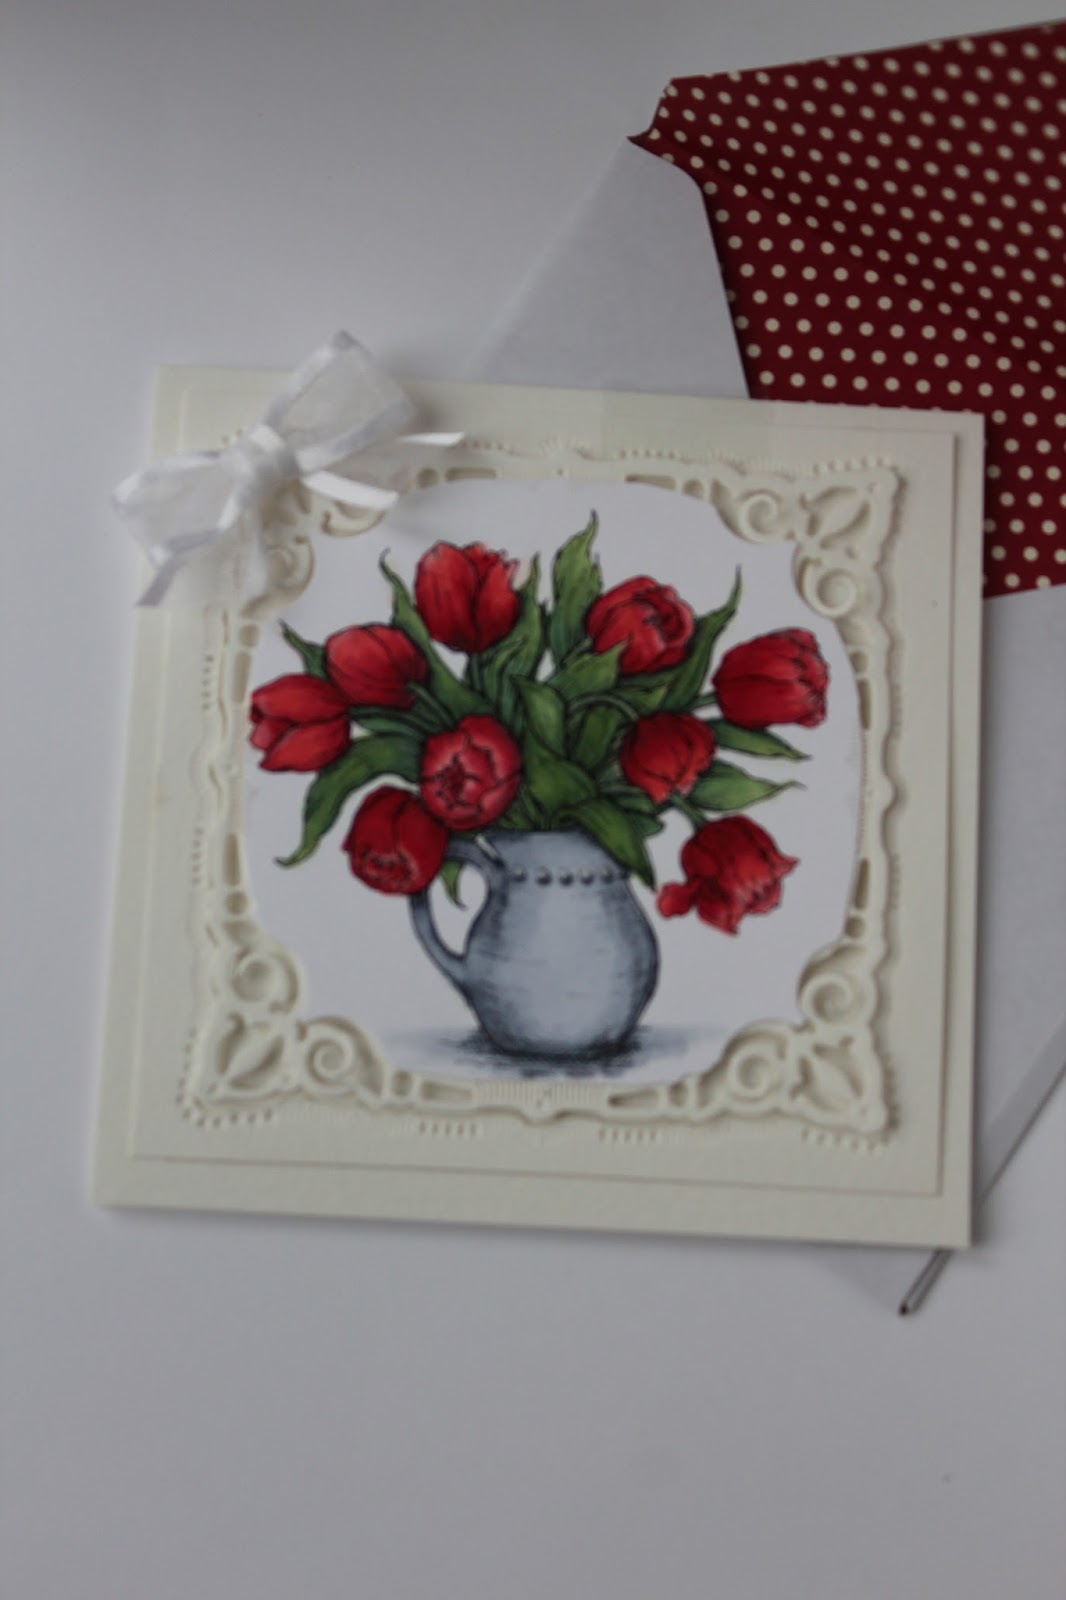
I started out by simply using a square die, and it took off from there. The base is white watercolor paper from Strathmore. The white layer on the top with the die cut is GKD layering weight paper.  I added another layer of white with the image stamped and colored on it.  I am just not that sure of myself to stamp and color directly on the die.  After it was all completed, I simply die cut the image and layered it on top, using foam tape to give it dimension. The bow was added after watching Gina K make several bows for cards.  I had forgotten to use them too. 

Here was my chance to make a matching envelope and also use up some papers that I had, to line the inside.  Now I had a really different card to send to someone special. I wonder who it will be?

Supplies used are:
Water color paper
GKD white layering paper
Spellbinder die, Adorning Squares
Copic markers R20, R14, R29 tulips G40, G43, G46, YG11 YG23 for the leaves
Pitcher, C1, C3, C5, C7

Thanks for stopping by, your comments brighten my day and are appreciated.


Sunday, June 11, 2017

Power and Spark - June Bug

The Power and Spark Challenge for this month is Go Ahead, Bug Me!  The prize is a $50 shopping spree and I am all in for that.  Wish me luck!
I had a print out, all ready to color, of the Countryside Bouquet.  I trimmed it down to fit my A2 size Sweet Corn card base, and a left over die cut from Spellbinder Romantic Rectangles in White.

                                                  Here is what I have for you.
 I used my copic markers to color and get the dimension that I wanted for the flowers.
 I made sure that there were some bugs on my panel.  The lady bug is stamped twice, and cut out than pasted over the top of the stamped one.  There is glossy accents on her.  The butterfly is actually a cutout of a piece of vellum that I had.  It was embossed and I added color to the back side of it. It makes a very delicate looking butterfly. 
Can you see the little V's of darker color on the poppies?  This was a technique that I saw in a video by Kelly Latevola. check it out, you will not be sorry.  I think I have improved the way the poppies look.
I am entering this in the Power and Spark challenge for June.

Thanks for stopping by, I love your comments and they brighten my day.

Thursday, June 8, 2017

Seize the Birthday - One Layer

Hello!   It is time for another challenge at Seize the Birthday.  Usually you need a lot of Wedding cards for this month, But I still need more Birthday cards.  Specially for the month of August.  All of my siblings, and my grand daughter are in the summer months.

We have a new Special Party Guest too.  Her name is Cathy and you can see her blog Here!
Please check out what all of the other designers have done at Seize the Birthday.


" Our "Toppings" option this time is...

                                                               "One Layer"
                                 Just remember to keep it a Birthday Theme!


        If you're not a toppings kinda person, well.....you can just
 stick with our usual "Anything Goes"Birthday!
  The choice is yours!
For my  one layer card, I when right to my no line water coloring.  More practice makes perfect! 
Here is my card. 
For my card, I started with a base of watercolor card stock.  I stamped the flowers from Altenew Adore stamp set, in an arrangement that I liked, with Distressed Ink in Antique Linen.  They are colored with Distressed ink in Wild Honey and Bundled Sage and Forest Moss.  I really watered down the Wild Honey to make the splatters.  The Beautiful script is from Gina K Designs Flowers and Frames stamp set. 
I will admit that this is not really a one layer card. I am still uneasy about water coloring directly on a base, so I used a panel and then set it off to one side and added the strip of gold foil. 

I am excited to see what yo all will be doing for this challenge.  I need ideas too.

Thursday, June 1, 2017

HUES TO USE

What a fun and different challenge from Power Poppy blog.  They give you three colors to use and see what you can come up with.  I needed some time to just sit back and color yesterday, and I decided to give this one a try.

                                           Here are the colors that they gave us.

                               
I had just printed out a digital image that begged to be colored, so I got out the copic markers that closely matched the colors here and started coloring.
 The background is a fun technique that i saw this weekend and wanted to try it our.  I used Distressed Oxide ink in Peeled Paint.  Smeared it on a Teflon sheet and spritzed water on it.  Then take an old credit card, and spread it on the panel.  The lines were make with the edge of the card.

I am entering this in the gallery at Hues to Use for more inspiration.  Check it out.
Thanks for stopping by to take a look and I love your comments, they brighten my day.