Thursday, April 27, 2017

Seize the Birthday April - Anything Goes

Welcome to another great challenge here
at Seize the Birthday!

You can go here or all of the details, Seize the Birthday and to see what all of the other designers have done. This week there is no toppings.  Feel free to create anything that you would like. 


               There are no topping for this challenge!

              Just remember to keep it a Birthday Theme!


The choice is yours

Don't forget,

We have a New Special Party Guest too.  Her name is Anita Bowden  and you will find her designs HERE. This is her last week with us, so give her some love.


    Here is my example! 

I waited a long time to be able to get this cute stamp set form My Favorite things.  This Magical Dragon will make great birthday cards for all ages.
I used water color paper from Canson and just spread blue all over it for my background. After die cutting the clouds with my Lawn Fawn, Spring Showers die, and the Die-namics Word Windows, I colored the dragon with my Distressed Inks pens.   He is fussy cut and then added to the clouds.  I did use some glitter on the clouds and Wink of Stella, clear on him. 

Don't forget to check out what all of the others have done for this challenge Here

Thanks for dropping in to see more.  Your comments brighten my day.

Dies two ways

Hello crafty friends!  Barbara here, to give you some inspiration and a way to use your dies in two different ways.  Let's get started.
                                              Here is the card that I made for you today.
I am also entering this card in the Simon Says Wednesday Challenge Anything Goes.

 This die is called Secret Garden, by Dee's Distinctively Dies, sold by Dies R Us.  The title of this die, made me think of something whimsical and magical and I wanted it to look that way.  I die cut some of the flowers from scratch paper.  You can use them as mask, as I did here.
On Kraft card stock I sponged around the outside of the mask with Kraft ink.


 I liked that look, but I wanted to make the flowers stand out more, so I used the negative card stock as a stencil and sponged white ink on them. You can see how I did that here.

After choosing the polka dot paper to put the Kraft background on, I got another idea and just totally made the flowers whimsical, and cut them from the same polka dot paper. I really like the magical look that I got and it was what I was going for.  Lastly I used wink of Stella and Glossy Accents on the centers of these Corn Flowers. I die cut some leaves out of the same paper to add to the blossoms. the stems are just free hand cuts.
                                                                  Secret Garden Flower 1

                                             Dee's Distinctively Dies - Secret Garden Flower 1
         Check out Dee's Distinctively Dies, there are several flowers that you could use for this.
Don't forget to come join in the fun at the Dies R Us Challenge Blog.
  There's a new challenge theme offered on the 1st and 15th of each month
 and one lucky randomly drawn winner will receive a gift voucher prize to
 the Dies R Us Store.  For your convenience, all the important
 Dies R Us links are provided below. 
click below for:
FRIENDS OF DIES R US PINTEREST PAGE

Thanks for stopping by the Dies R Us Blog today!!

Monday, April 24, 2017

Power and Spark Challenge

Today's card was made very quickly for this challenge.  Not that it was easy, it was just that some cards show up on your craft room table just like you planned then.  Other... not so much.  This was one of those that I was able to get the ideas in my head on to the paper and liked it the first time. 
                                                              Here is the challenge.
We simply were to use one of these sketches. As soon as I saw it, I knew the one tat I wanted to do. I have used this die many times and so I thought, why not again.
Here is my card.
The ingredients: Gina K  Designs card stock in Moonlit Fog, and Ivory
A layer of beautiful embossed vellum that is from a scrapbook kit that I bought ages ago.
Die-namics dies, Stitched Fishtail Frame and Word boxes, The single rose from Power Poppy Everything's Even Rosier stamp set. Copic markers, some crystal sequins and rhinestones splattered for accent.


I took a picture of this card with two different backgrounds and could not decide on which one that I should use, so I put both of them on my post.  I think I really like the one with the pink background to enhance the rose.  What do you think?

This card will be entered in the Power and Spark challenge at Power Poppy
Thanks so much for taking a closer look, I really appreciate your comments, they do brighten my day.


Thursday, April 20, 2017

Dies R Us Background Building

Hello, Dies R Us crafty friends!  Barbara here today to show you how to use your dies to make interesting backgrounds that will "back up" your designs.  I love this technique and use it often. Follow our blog to get inspiration and wonderful ideas for your projects.
Here is the card that I did to show you  this technique.
 I used just three dies to make this card. I started with a base A2 size card of Bazzill Green Tea card stock.  I cut all of the rectangle dies of the same paper.  This added teture to your project and still lets the image show through. The flower was colored and shaped with a stylus and I added some seed beads to the center.  The sentiment was cut from Gold Contact paper. It works great for die cutting and you just peel off the back and adhere it to the next layer.  In this case, I cut two other layers of the sentiment and layered them all together, gold on the top.  Then I assembled the elements on the design in the way that made me smile. I tried to get another angle to show off the gold in the net picture. 
This is a different view that shows you a peek at the inside.  I used the part that I cut off of the right side of the rectangle die, on the inside. Don't let any part go to waste. I wish I had a better picture.

I use this technique often for my cards and I hope that you will try it.  Don't limit yourself to rectangles.  Try squares and circles and anything that make you happy!

These are the dies that I used for this card.

  Frantic Stamper - Dies - Elementals #16 - Stitched Rectangle Frames
You will find yourself using these rectangles many times. They cut a thick frame or a thinner one. I used the thinner one on my card.
Penny Black - Dies - Gaiety 
                                         Frantic Stamper - Dies - Life Is Good 

Don't forget to come join in the fun at the Dies R Us Challenge Blog.  There's a new challenge theme offered on the 1st and 15th of each month and one lucky randomly drawn winner will receive a gift voucher prize to the Dies R Us Store.  For your convenience, all the important Dies R Us links are provided below.  

Thursday, April 13, 2017

Seize the Birthday - Two Pattern Papers

          Welcome to another great challenge here at Seize the Birthday!

These two weeks of fun go really fast, but not too fast for you to enter. You can go here or all of the details, Seize the Birthday and to see what all of the other designers have done.
                          

               The toppings for this challenge are two pattern papers!

              Just remember to keep it a Birthday Theme!

            If you're not a toppings kinda person, well.....you can just

                stick with our usual "Anything Goes"Birthday!

The choice is yours

Don't forget,

We have a New Special Party Guest too.  Her name is Anita Bowden  and you will find her designs HERE.


    Here is my example! 

Ingredients:  Watercolor paper base, just had it left over from another card.
SU Love Notes framelets and Sealed with Love stamp set.
Recollections 6x6 paper pack, Fashionably Chic
Cleary Besotted Stamp, Little Sentiment
Penny  Black die, Border Edges ( my favorite)

OK, can't wait to see what you all will do for this challenge.


Wednesday, April 12, 2017

Mod Squad Challenge for April

Hello, for the challenge this week  at the Mod Squad,  I  will be your Host and Designer. I  hope you will play along!

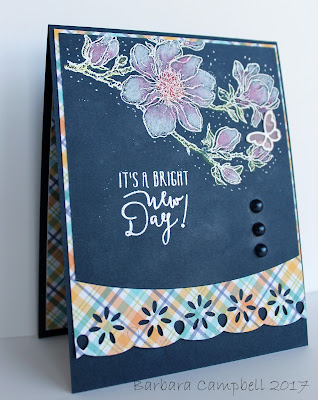
Chalkboard techniqueThe challenge this week is to use this technique on your project!
You can find this technique on Youtube.com  here   Have fun!


               Power poppy is the sponsor this week.  The prize is,

$25 to the Power Poppy Store. You can use your Digis or clear stamps!

If you use your Power Poppy stamps or digis, you will get two chances to win. 
Check out the challenge Mod Squad
Thanks for stopping by!


Tuesday, April 4, 2017

Some Exciting News!

I am so very happy to tell you that I am joining the team at Dies R Us!  This is my first post with them.  We will be bringing you some  inspiration every day.  Stay tuned, and follow the blog! Being part of the design team makes me smile all day long.
I am sharing with you a card that I made for someone that needs a Big Hug every day. My sister was recently diagnosed with cancer and this card is for her.


I started with an Ivory,  A2 base and added another panel of Ivory just a 1/4 inch smaller than the base.  Next I die cut the window with Memory Box Distressed Windham Collage.  I did place a piece of acetate behind the window. (This would make a great shaker card) to give it dimension, I put a panel of fun foam under that. Then I simply die cut the Poppy Stamps, Stitched Pumpkin Leaves and Emelia Butterfly Trio along with the Devyn Butterfly Trio.  Note: I used vellum for the solid part of the butterfly. I colored the large butterfly, on the back with a Copic BG75,  and added some liquid pearls too.  The leaves were cut from sage green paper, and the edges were swiped with ink for some texture.
Here is what I used:  
Memory Box - Dies - Open Studio - Distressed Windham Collage 
 Memory Box Distressed Windham Collage
 Poppystamps - Dies - Emelia Butterfly Trio
Poppy Stamps Emelia Butterfly Trio
      Poppystamps - Dies - Devyn Butterfly Trio
   Poppy Stamps Devyn Butterfly
Poppystamps - Dies - Stitched Pumpkin Leaves (NEW)
 Poppy Stamps Stitched Pumpkin Leaves.

I sure am going to have fun with these dies for the autumn season.
Thanks for stopping by.  The design Team will be sharing beautiful inspirations for you all.
Some new designers will be joining me starting this month.

Don't forget to play along at the Dies R Us Challenge Blog for your chance to win a gift voucher to the Dies R Us Store.  A new challenge begins on the first and fifteenth of every month.  Be sure to Follow Us on Facebook too. 

Thanks so much for stopping by, there will be more every day for the new design team.
Enjoy the inspiration